Student Guide

Managing Appointments

Starfish is a convenient way for you to schedule appointments with your academic advisor and other people within your Success Network. In a few easy steps, you can schedule or cancel a meeting with your advisor.  

Video Instructions

Schedule an Appointment

  1. Access Starfish.
  2. On the My Success Network page locate your Academic Advisor.
  3. Click the navigation icon White square with three small dots in the middle of it in a horizontal line.   next to the name of your advisor and then select Schedule. 
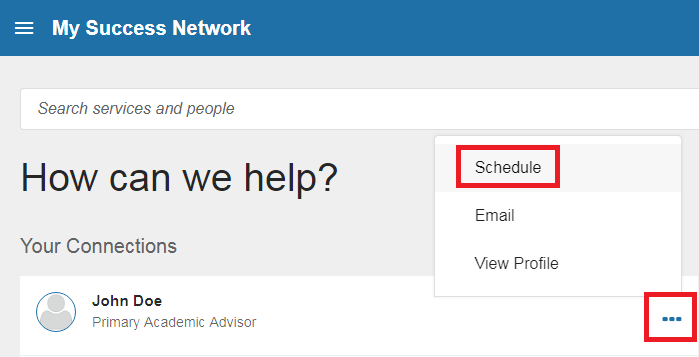
    Top left corner has a hamburger button with the text “My Success Network” next to it on a blue banner. Under the banner, there is the search bar to type in any name directly and under that there is a heading “your connections” with the advisors name and an ellipsis (with a red box around) at the end of the row. Clicking the ellipsis opens a new popup menu with Schedule, Email, and View Profile. There is a red box around the Schedule option.
  4. If your advisor has advising walk-in hours scheduled, they will be displayed in the top right corner of the page.White rectangle with a blue border on top. In the far left of the border there is a white X and to the right of this in white it says “Schedule Appointment”. Under this blue section in the far left there is a blue outlined circle and to the right of this it says “John Doe” and under this it says “Primary Academic Advisor”. To the far right it says “This Week’s Walk-In Hours”, under this it says “Office Hours: Friday 1:00 – 3:00 PM”, and under this it says “Walk-in Advising: Tuesday 1:00 – 3:00 PM”.
  5. Select Academic Advising and choose a reason from the list, and click Continue.White rectangle at the top it says “What do you need help with?” Under this there is a drop down that is a thin rectangle outlined in orange that says “Academic Advising” in the far left and has an arrow tip pointing upward in the far right. Under this there are four rectangles lined up on the right half and four lined up on the left half. Each of these have a small circle in the far left that can be selected. Each of these say something next to the circles starting in the top left one it says “Academic Planning/Registration”, the next one down says “Considering Change of Major”, the third one says “Co-op/Internship/Study Abroad”, and the final one in this column says “New Student Advising: Freshman/Transfer”. The one in the top right says “Academic Success/Support”, the second one says “Considering Course Withdrawal”, the next one down says “Mid-Degree Advising”, and the final one down says “Personal Concerns”.
    1. For group sessions, your advisor/instructor will need to communicate the appointment reason to select. If you do not select the correct reason, the group session will not display for you to register.
       
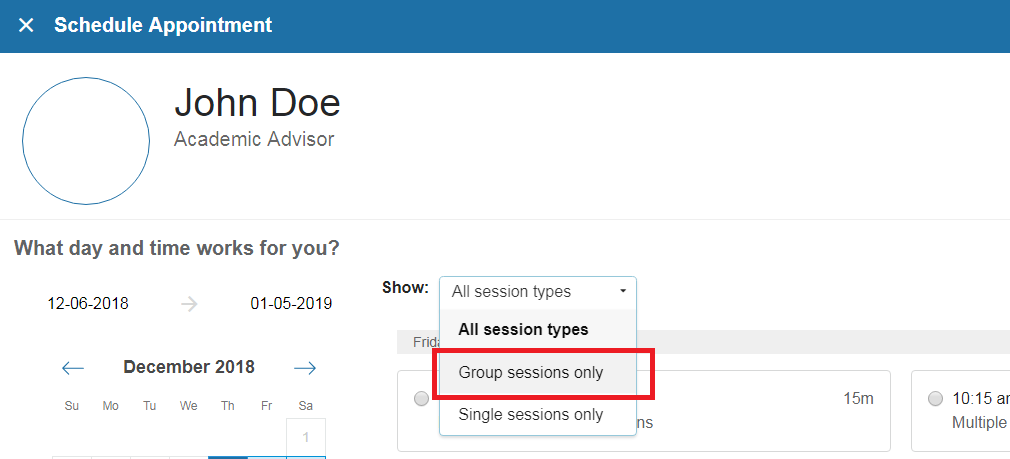
  6. On the next screen, there is a drop-down filter that allows you to select group advising sessions (if available) or individual advising sessions.This shows the Schedule Appointment tab with an 'x' at the top most left corner with “Schedule Appointment” next to it. Below that, there is a circle to hold the profile picture of the advisor and next to that was the name of the advisor “John Doe” and below their role “Academic Advisor”. Under this region, there is the heading “What day and time works for you?” and below that is a calendar and beside there is a popup with different session types. It has “All session types”, “Group sessions only”, and “single sessions only”. There is a red box around the group sessions only.
    1. If you are trying to find a group session, you can select "Group sessions only". If the group session does not appear, refer to step 5a.
       
  7. Adjust the date range as needed to find days and times that work for your schedule, and then select a time from the list, and click Continue.There is a heading with “what day and time works for you?” and below that on the left side, the top shows a range of a month from 09-20-2018 to 10-20-2018. There is a blue line under 09-20-2018 indicating the month the calendar under is showing. The right side of the page shows all the slots of time available in 15 minute blocks from 10:00am to 12:00pm.The bottom left has a ticked box for Show group meetings.
    1. If you selected "All session types" you can tell the appointment is a group session if it has an icon of two people beside the time.White rectangle with a grey top border, on the left of this top section it says “Thursday, March 05” and on the right it says “4 available”. Under this there is a smaller rectangle on the left half of the image. Within this rectangle there is a small circle in the far left that can be selected, to the right of this it says “1:00 pm – 1:45 pm” next to this there is a small square outlined in red with two people icons in the middle of it. Under the times it says “Gol 2500” and to the far right of the rectangle it says “45m”.
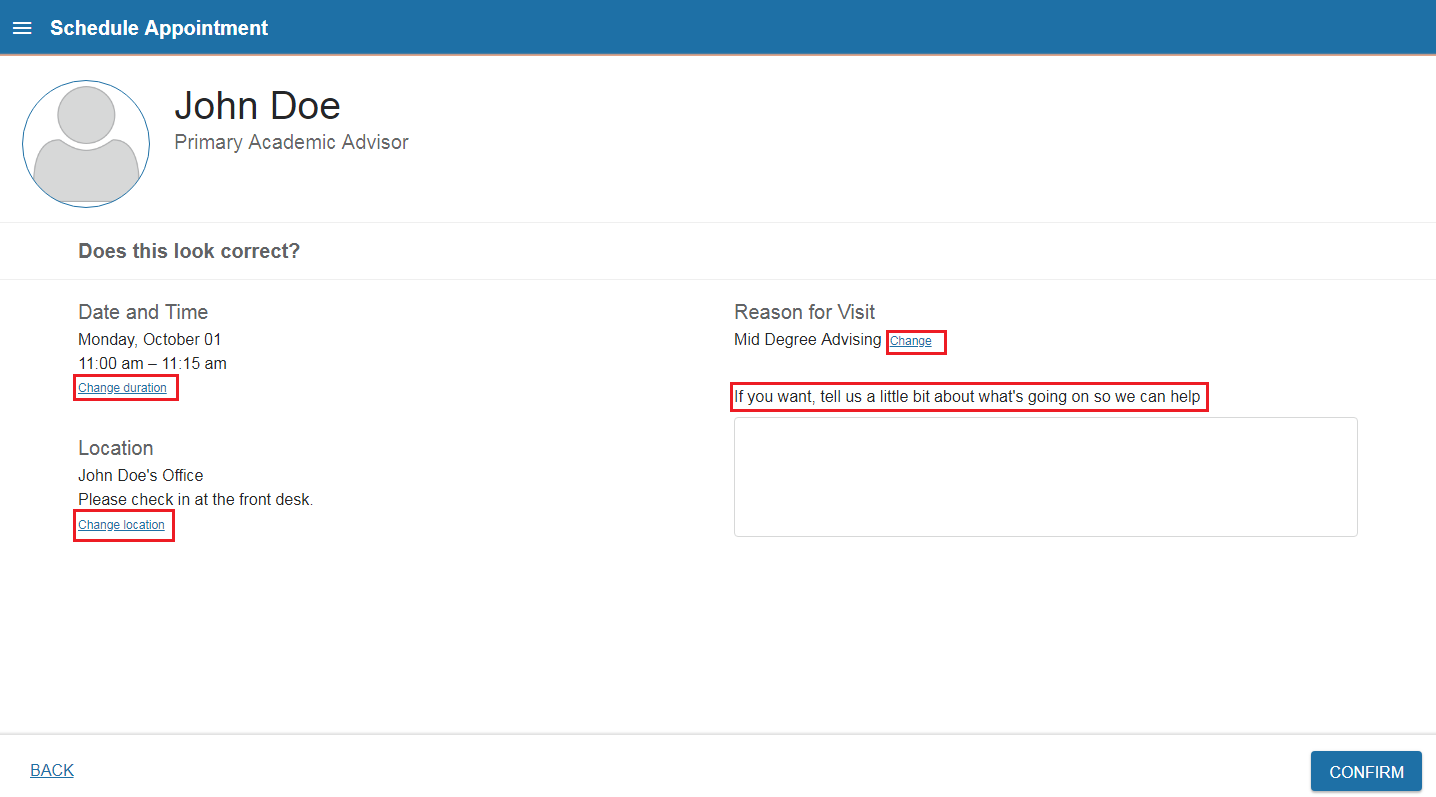
  8. On the next page, you can verify the details of your meeting and/or make adjustments to the duration, location, and reason (as needed) and add a brief description of why you want to meet.This shows the schedule appointment confirmation page that under the advisor name has text “does this look correct?” It shows the Date and Time section with a red box around hyperlink for change duration on the left region. Below that is the Location section with a red box around the change location hyperlink. To the right of the page there is the reason for visit heading with a red box around the change hyperlink and below that there is also a red box around “if you want tell us a little bit about what's going on so we can help” and has a textbox under it.  The confirm button is at the bottom right corner with a back button on the bottom left side.
  9. Click Confirm to finalize your meeting.
  10. You will get an email with the appointment details and the appointment will be listed on the Upcoming tab.

View Upcoming Appointments

  1. From the Starfish My Success Network page, select the navigation menu Blue square with three horizontal white lines. in the upper left corner of the screen.
  2. Then click Upcoming. On this page, you will see all your future appointments you have scheduled in Starfish.
    There is a blue banner with the hamburger button and “Upcoming” next to it at the top of the page. In the main section of the page, there is an appointment card showing “John Doe” and “Primary Academic Advisor” at the top. Below that, there is a clock icon with “Friday, September 14 10:00 – 10:15” beside it. Below that, there is a location icon with “John Doe’s Office, please check in at the front desk” beside it. At the bottom of the appointment card, the right corner has an ellipse icon to view more details.

Canceling an Appointment

  1. In Starfish, click the navigation menu Blue square with three horizontal white lines. in the upper left corner of the screen.
  2. Click on Upcoming
    Stacked text that displays a menu with the following options: Dashboard, My Success Network, and Upcoming
  3. Locate the appointment you want to cancel and click on the ... at the bottom right of the box.    	There is a blue banner with the hamburger button and “Upcoming” next to it at the top of the page. In the main section of the page, there is an appointment card showing “John Doe” and “Primary Academic Advisor” at the top. Below that, there is a clock icon with “Friday, September 14 10:00 – 10:15” beside it. Below that, there is a location icon with “John Doe’s Office, please check in at the front desk” beside it. At the bottom of the appointment card, the right corner has an ellipse icon to view more details.
  4. A box will open; select Cancel appointment.
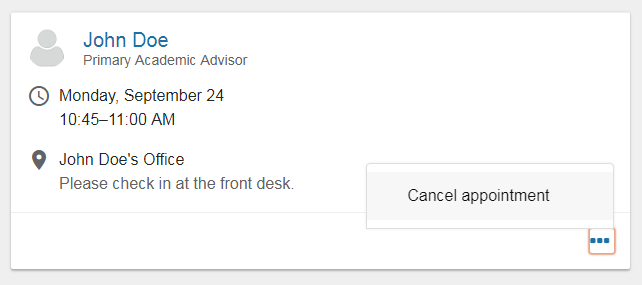
     When the ellipse at the button right corner of the appointment card is clicked then the Cancel Appointment button pops up. There is an orange box around the ellipse to indicate the click action.
  5. Another window will open allowing you to send a message detailing why you are canceling the appointment. Include any information you want and press the Cancel It button. There is text: "Are you sure you want to cancel your appointment with (blank) on (date and time)? You can add a message explaining why you need to cancel:" at the top of the image. An empty box is below the text to enter text into. In the bottom right corner are two buttons a grey button that says "Keep it" and a blue button that says "Cancel It"

Starfish Quick Links: